Get deals, discounts & more
We will send you a link, open the link & download the App
You have no items in your shopping cart.
Post Requirement
For any enquiry call
Post Requirement
Fill the following details. Our executives will get back to you shortly.
Tiles add beauty to any floor. They are moisture-resistant and also provide a magnificent look to any of the room in the house, whether it is for floors or walls.
If you are planning to install tiles for your house, then this guide will help you to have an idea of what to implement and whatnot.
Before laying tiles, prepare your floor by removing any adhesives, mortar, etc. Level the surface to flat by filling any low spots and cracks in a concrete floor with concrete patching compound.

Make sure that the floor is clean, dry and levelled evenly.
The tiles should be laid out in the best way to create aesthetic appeal with shapely cutting.

Begin by measuring each length of the wall, and also consider diagonals of the room. Take chalk and note down lines on the floor parallel to the walls that help to place tiles in order.
Adhesives or thin-set mortars are used as bonding agents to attach the tile to the background concrete floors.

Mix up the adhesives with sufficient water, not too less and not too many, thick like a toothpaste to avoid short working life.
Before applying adhesive if you want your floor to look more flawless, then lay out some tiles and see how the polished floor is going to look like.
Now, spread the mortar with a notched trowel evenly on the surface depending on the size of the tile. Place the first tile on the adhesive or mortar and press it gently.

Position the next tile by aligning the edges and corners using plastic spacers to place the joints uniformly.
Once full tiles are laid leaving corners, the next step is to fill the gap between the laid tile and the wall.
A scoring cutter or a wet saw equipped with a diamond tripped blade can be used to make both partial and straight cuts on a tile.

Place the tile on the cutter and run the blade, break it by pressing it down and lay it on the adhesive. Repeat this process to fill the entire gap between the laid tiles and walls.
Grout fills the gap between the tiles. Ensure that joints are free from dust and debris before filling. After the mortar has set and tiles are laid, the joints are filled with grout.
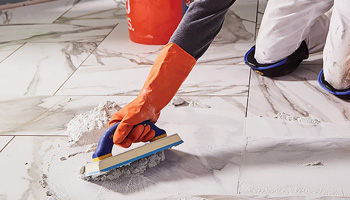
Apply the grout with a rubber float and allow it to set up for a few minutes.
Wipe-out any excess adhesive to make them level using sponge and bucket of water, sponge out frequently to keep it clean.
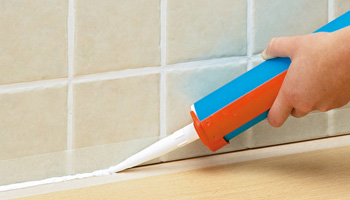
After the grout has settled for some time, use applicator bottle or foam brush to apply the sealants. Wipe off the extra sealer within 10 minutes.
One misplaced tile can take away the look of your floor. So, you should be careful and take whatever precautions needed while installing the tiles.
Check Out: Types of Tiles and their Uses in Construction
* Required Fields
For Latest Blog Posts, Subscribe here!
We respect your email privacy
Build Smart with BuildersMART
BuildersMart
# 8-10, Fortune Chambers ,
Image Gardens Lane, Hi-Tech City,
Madhapur, Hyderabad-500081.
Telangana.
Phone : 9339330099
WhatsApp : +91 9339330099
Email : [email protected]
Login to Proceed
![]()
Please enter your email address below. You will receive a link to reset your password.
* Required Fields